Affiliate Disclosure
HVAC Guide Guys is a participant in the Amazon Services LLC Associates Program, an affiliate advertising program designed to provide a means for sites to earn advertising fees by advertising and linking to Amazon.
Are you tired of uneven temperatures and high energy bills from bad HVAC systems? Learning how to install an HVAC register box could change your home’s comfort.

Installing an HVAC register box might look hard, but with the right tools and knowledge, you can make your home’s heating and cooling better. This guide will show you how to do it yourself, step by step.
HVAC register installation is more than just putting a metal box in your wall or floor. It’s about linking your ductwork to your living spaces well. This improves airflow and energy use. Experts say the right installation can cut down on energy loss and make your system work better.
Key Takeaways
- Learn professional techniques for HVAC register box installation
- Understand the critical role of proper register box placement
- Discover tools and safety measures for successful installation
- Reduce energy waste through precise ductwork connections
- Improve home comfort and temperature regulation
Table of Contents
Understanding HVAC Register Boxes and Their Role in Your Home
Your home’s heating and cooling system is complex. It has many parts working together to keep you comfortable. The HVAC register box is a key part that often goes unseen but is very important.
Think of your ductwork as your home’s circulatory system. Register boxes connect hidden air paths to the rooms you live in. They make sure air flows well from your ductwork to the rooms.
What Is an HVAC Register Box?
A register box, or supply boot, helps air move from your ductwork to rooms. They come in different shapes and sizes, made from strong materials like steel or aluminum. When installed, they do several important jobs:
- Redirect airflow from round or rectangular ducts
- Provide a secure mounting surface for register grilles
- Help maintain proper air pressure in your HVAC system
Why Proper Installation Matters for Airflow and Energy Efficiency
Putting register boxes in the wrong place can waste a lot of energy. Improperly installed register boxes can cause up to 30% air leakage. This makes your system less efficient and raises your utility bills. Following the right placement tips is key for good performance and comfort.
Common Types of Register Boxes and Boot Assemblies
HVAC boot assemblies come in different types for various needs:
- Straight boots for perpendicular connections
- Angled boots (45 or 90 degrees) for wall registers
- Ceiling boots with round configurations
- Floor boots featuring rectangular designs
Knowing about these supply boot functions helps homeowners make better choices during HVAC maintenance and installation.
Explore Our HVAC Shop
Looking for top-rated HVAC tools, parts, and accessories? Visit our shop and find the perfect solution for your needs.
Visit the ShopEssential Tools and Materials You’ll Need
Getting ready for your HVAC register box installation means you need the right tools and materials. A good register box installation tools kit will help your DIY HVAC project go smoothly and efficiently.
Before you start your hvac boot box mounting guide, make sure you have these essential tools:
- Measuring Tools:
- 25-foot tape measure
- Carpenter’s square
- Marker or pencil
- Level
- Cutting Tools:
- Tin snips (left, right, and straight cuts)
- Utility knife
- Drywall saw
- Fastening Tools:
- Cordless drill with various bits
- Screwdriver set
- 1/4-inch hex driver
- Staple gun
Don’t forget the important sealing materials for your DIY HVAC tools required list:
- UL 181-rated foil tape
- Mastic sealant
- Paintbrush for applying sealant
- Caulk gun
Safety is key during installation. Always wear protective gear:
- Leather work gloves
- Safety glasses
- Dust mask or N95 respirator
- Knee pads
- Work light or headlamp
Pro tip: Invest in quality tools for a professional-grade installation. Avoid standard duct tape, which degrades quickly. Choose metal-backed foil tape rated for HVAC applications for long-lasting results.
Safety Precautions Before You Begin Installation
HVAC installation safety is all about being careful and detailed. Experts know that working with sheet metal and register boxes needs strict safety rules. This is to avoid serious injuries.
Before you start installing your HVAC register box, safety comes first. You’ll face dangers like sharp metal, electrical risks, and tough work environments.
Protective Equipment Requirements
Wearing the right safety gear is key when securing an air register box. You’ll need:
- ANSI-approved safety glasses with side shields
- Heavy-duty leather work gloves
- Dust mask or N95 respirator
- Long-sleeved shirt and long pants
- Steel-toe work boots
- Knee pads for crawl space work
Working Safely in Attics and Crawl Spaces
Working safely with sheet metal in tight spots is critical. Here’s what to do:
- Always use plywood walking boards across joists
- Ensure adequate lighting with work lights
- Work during cooler morning hours
- Use fans for air circulation
- Never work alone in confined spaces
| Safety Area | Recommended Precaution |
|---|---|
| Electrical Safety | Turn off circuit breakers, use voltage tester |
| Temperature Control | Work during cool hours, use ventilation |
| Personal Protection | Wear complete safety gear |
Remember: Your safety is more important than any HVAC installation project. Taking time to prepare and protect yourself prevents serious injuries.
Explore Our HVAC Shop
Looking for top-rated HVAC tools, parts, and accessories? Visit our shop and find the perfect solution for your needs.
Visit the ShopPlanning Your Register Box Placement
Starting with the right register box placement is key to good HVAC airflow. It’s all about picking the best spots for your registers. This ensures your room stays comfy and energy use is low.

- Floor Registers:
- Put them along exterior walls under windows
- Keep 6-12 inches from walls for better air flow
- Steer clear of busy areas and door paths
- Ceiling Registers:
- Choose corners for the best air flow
- Avoid spots near ceiling fans
- Opt for lower parts of sloped ceilings
- Wall Registers:
- Place them 6-12 inches from the ceiling
- Go for interior walls if you can
- Make sure they’re not blocked by furniture or doors
Pro Tip: Make a detailed drawing before you start. Measure joists, plan duct paths, and check local building codes.
Smart register placement can boost your HVAC’s performance by up to 25%.
Room size is important for figuring out how many registers you need. Aim for one register per 150-200 square feet. Adjust this based on the room’s specific needs:
- Bedrooms: 100-150 CFM
- Living Areas: 150-250 CFM
By using these strategies, you’ll get a balanced, efficient HVAC system. It will keep your home comfy all year.
Preparing the Installation Area and Cutting Openings
Starting a ceiling register installation needs careful planning. You must place the register box with precision. This ensures your HVAC works well and looks professional.
Before you cut openings, you have to do some important steps. You need to plan and measure well. This helps place your HVAC system perfectly.
Measuring and Marking Your Register Location
Here’s how to prepare the register location:
- Use a stud finder to find ceiling joists
- Mark joist spots with painter’s tape
- Measure the register box size carefully
- Find the middle spot
- Make sure the opening is between joists
Cutting Through Materials
When cutting openings, you need different methods for each material:
- Drywall: Score with a utility knife, then cut with a drywall saw
- Hardwood: Use a circular saw at the flooring depth
- Carpet: Cut big, then trim exactly
Framing Between Joists
If your opening doesn’t fit with joists, you need to frame. Use 2×4 lumber to block between joists. This makes a solid base for your register box.
Pro tip: Always check your measurements and use levels. This ensures a top-notch installation. It helps with airflow and saves energy.
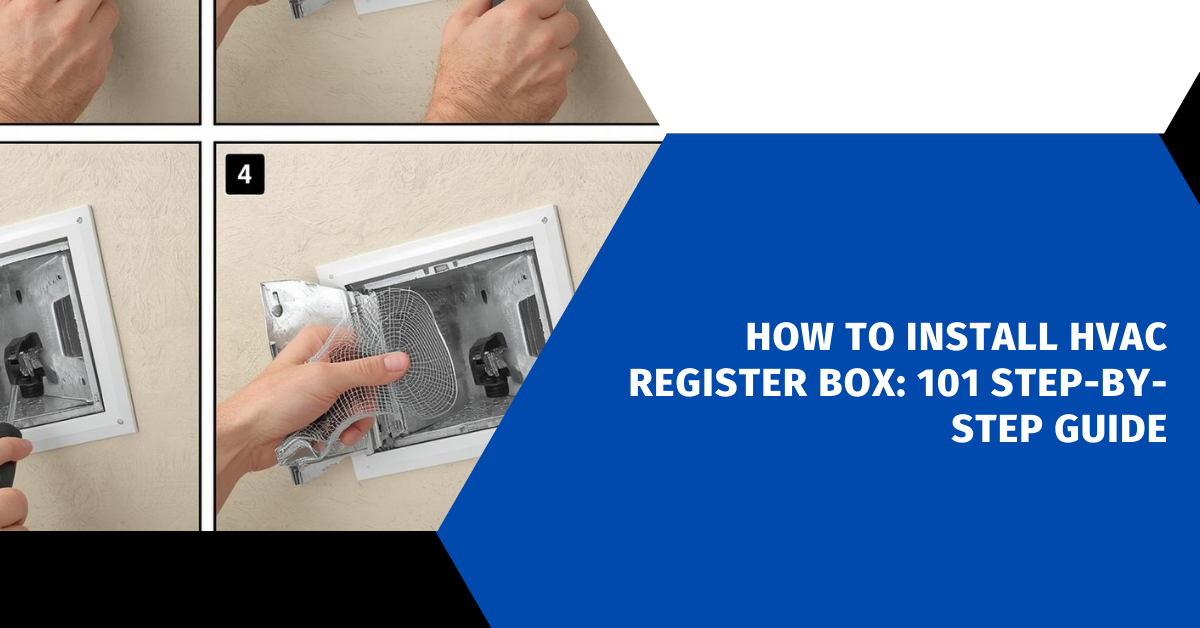
How to Install HVAC Register Box Step-by-Step
Installing an HVAC register box needs precision and attention to detail. The process involves several key steps. These steps ensure good airflow and energy efficiency in your home.
- Drill with Phillips bit
- Sheet metal screws
- Measuring tape
- Utility knife
- HVAC foil tape
- Mastic sealant
Follow this guide for a professional installation:
- Position the Register Box
- Check if it fits the opening
- Make sure the duct collar is right
- Confirm the airflow direction
- Secure the Box to Framing
- Use #8 x 1/2-inch sheet metal screws
- Drive 4-6 screws around the perimeter
- Ensure it’s level and flush
- Connect Ductwork
- Slide flexible duct over boot collar
- Secure with zip ties
- Seal connections well
Sealing and insulation are critical. Use mastic sealant around all connections to stop air leaks. If the boot goes into unconditioned spaces, wrap it with R-8 insulation.
| Installation Step | Key Considerations |
|---|---|
| Box Positioning | 1/4 inch clearance on all sides |
| Ductwork Connection | Minimum 2-inch overlap on collar |
| Sealing | Cover entire joint with sealant |
Finish by installing the register grille. Make sure it sits flush and works smoothly. Double-check all connections to improve your HVAC system’s performance and energy efficiency.
Connecting Register Boxes to Ductwork Properly
Connecting register boxes to ductwork right is key for your HVAC system’s health. Wrong connections can lead to air leaks, less airflow, and higher energy bills.
Knowing how to connect flexible ducts and secure metal ducts is vital. It ensures your air system works well and efficiently.
Attaching Flexible Duct to Boot Boxes
Here are the essential steps for attaching flexible ducts:
- Stretch the flexible duct to its full length
- Cut the duct precisely to required measurements
- Use approved zip ties for secure connections
- Support the duct every 4 feet to prevent sagging
Securing Metal Ductwork Connections
Metal ductwork needs a special method for tight connections:
- Overlap duct sections by at least 1.5 inches
- Install three evenly spaced sheet metal screws
- Apply mastic sealant around the entire connection
- Use metal foil tape as an additional seal
| Duct Type | Connection Method | Sealing Technique |
|---|---|---|
| Flexible Duct | Zip ties | Mastic sealant |
| Metal Duct (Round) | Sheet metal screws | Mastic + foil tape |
| Metal Duct (Rectangular) | Drive cleats | S-cleats with sealant |
“Proper duct attachment is the key to an efficient HVAC system.” – HVAC Professional
A sealed duct system boosts your home’s energy efficiency. It stops air leaks and keeps airflow perfect.
Explore Our HVAC Shop
Looking for top-rated HVAC tools, parts, and accessories? Visit our shop and find the perfect solution for your needs.
Visit the ShopSealing and Insulating for Maximum Efficiency
Sealing and insulating your HVAC system is key for its performance and energy use. Your register box setup isn’t done without these steps to stop air leaks.

- Use mastic sealant application for permanent, flexible connections
- Avoid standard cloth duct tape which deteriorates quickly
- Seal all joints, seams, and connection points thoroughly
For insulating register boxes, follow these important tips:
- Use insulation that meets local building codes
- Make sure to cover all metal surfaces
- Keep it safe from moisture in unheated areas
“Proper insulation isn’t just about energy efficiency—it’s about protecting your entire HVAC system’s long-term performance.”
Focus on these key areas:
| Location | Sealing Method | Insulation Requirement |
|---|---|---|
| Register Boot Connections | Mastic Sealant | R-8 in Unconditioned Spaces |
| Duct Joints | UL-181 Rated Tape | Complete Coverage |
| Plenum Connections | Mechanical Fasteners + Sealant | Vapor Barrier Facing |
Remember, careful sealing and insulation can prevent up to 30% energy loss. Spend time to seal and insulate your register boxes for the best HVAC system performance.
Installing the Register Grille and Testing Airflow
The last step in your HVAC register box installation is mounting the register grille and checking air flow. These steps are key to making sure your system works well and keeps your home comfortable.
Installing the register grille needs careful attention and the right mounting techniques. Each type of register has its own way of being installed:
- Floor registers with spring-loaded mounting
- Screw-mount floor registers
- Ceiling register installations
- Wall register placements
Mounting Different Types of Register Covers
When you’re mounting register covers, keep these tips in mind:
- Make sure registers fit flush with the surface
- Double-check they’re level and aligned right
- Make sure damper controls work smoothly
- Put protective screens on floor registers
Checking for Proper Air Distribution
Testing HVAC airflow means following a few important steps. To check air distribution, do this:
- Clear out debris from ductwork
- Run the HVAC system in continuous fan mode
- Check airflow at each register
- Use a tissue test to see air movement
- Listen for odd noises that might mean a problem
Verifying air distribution means making sure each room gets the right amount of air. Most homes need 35-50 CFM for each outlet. This keeps the temperature just right.
Common Mistakes to Avoid During Installation
When you’re installing an HVAC register box, knowing common mistakes can save you a lot. DIY projects often go wrong, but you can avoid these issues. This way, you’ll have a more efficient system.
Here are the top register box errors to avoid during your duct installation project:
- Incorrect Sizing: Using undersized register boxes restricts airflow and reduces system efficiency
- Poor Sealing: Neglecting to properly seal boot flanges creates air leakage and energy waste
- Improper Support: Unsupported ductwork leads to sagging and reduced air circulation
- Incorrect Placement: Positioning registers where furniture blocks airflow compromises comfort
“The difference between a good HVAC installation and a problematic one often comes down to careful attention to detail.” – HVAC Professional Insight
Simple details often cause big problems in duct installation. To avoid these mistakes, plan carefully and execute each step with precision.
| Mistake | Potential Consequence | Prevention Strategy |
|---|---|---|
| Kinking Flex Ducts | Reduced Airflow by 60% | Maintain Gentle Curves, Support Properly |
| Improper Sealing | Energy Loss | Use Mastic or Professional Foil Tape |
| Inadequate Insulation | Temperature Inefficiency | Insulate in Unconditioned Spaces |
By understanding these critical HVAC installation mistakes, you’ll create a more efficient, reliable, and comfortable home ventilation system. Remember that careful preparation and precise execution are key to successful register box installation.
Conclusion
Learning to install an HVAC register box is a big win for homeowners. It shows you’re serious about making your home more comfortable and energy-efficient. Your hard work and dedication to DIY projects are clear.
The journey to install an HVAC register box is more than just a simple task. It’s about understanding how each part works together. By following this guide, you’ve made a big step towards better heating and cooling in your home.
Don’t forget, keeping your system in good shape is important. Check it often, change filters when needed, and clean the grilles. Also, get your HVAC system checked by a pro every year. This keeps it running well and catches problems early.
While DIY projects can save money and feel rewarding, don’t hesitate to ask for help if needed. Your home’s comfort and safety should always come first in any HVAC project.